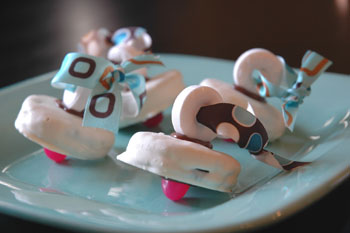
Written on April 30th, 2009 by Kim
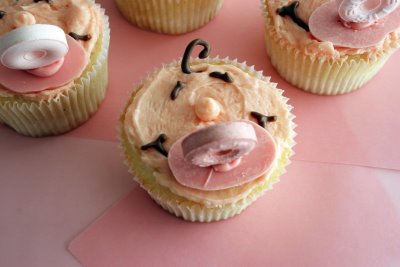
While scouting for cool ideas to complement our baby shower invitations and decor, I ran across these a few days ago and just had to share this simple idea from the Taste and Tell blog.
Here’s what you’ll need to decorate your cupcakes:
- Melting chocolate (dark and pink)
- Life saver candies
- Wax paper
- Resealable bag (freezer works best)
- #2 icing tip with connector
- Pink tinted icing
For all the details and some great step-by-step pics, visit the Taste and Tell blog.
Happy baking!
Tags: creative pacifier baby shower cupcake idea, life saver cupcake
Posted in baby shower, cakes & cupcakes · No Comments »
Written on April 29th, 2009 by Kim
With spring in full swing, it’s the perfect time to celebrate with our custom “bugs & butterflies” invitations and cool Design Design mixed dots table décor including cake plate, table runner, plates, napkins and more. Or, if you’re more into pink polka dots and butterflies, check out our “butterflies” theme.
And to round out your bug bash, check out some sweet treat and craft ideas:
Happy planning everyone!
Tags: bug cookies, bugs and butterflies birthday party invitation ideas, sunflower cupcakes
Posted in bugs & butterflies · No Comments »
Written on April 28th, 2009 by Kim

Have a pirate longing for a swashbuckling good time? Invite the crew to weigh anchor and follow the treasure map to this fabulous pirate ship cake from parenting.com. It’s the perfect addition to our pirate ship birthday party or pirate skull birthday party theme.
Here’s the ingredients and supplies you’ll need:
- 1 (13 by 9-inch) cake
- 1 can (16 oz) dark chocolate frosting
- Yellow food coloring
- ½ can (1 cup) vanilla frosting
- 1 plain breadstick (8 inches long)
- 16 yellow mini-candy-coated chocolates
- 6 PepOMint Life Savers
- 1 cup blue coarse decorating sugar
- 2 thick pretzel rods
- A bread knife
- A serving platter
- A fork
- Scissors
- Black and white construction paper
- Glue
For all the “how to” details and a template for cutting out your cake, visit parenting.com. Happy baking matey!
Tags: DIY pirate ship birthday party cake with sails
Posted in cakes & cupcakes, pirate · No Comments »
Written on April 25th, 2009 by Kim
We’ve just added some really cute cookie cutters to our “rock star” birthday party theme. Don’t you just love the flames! You can find guitar, musical notes and star cookie cutters with all of our other “rock star” decor.
As for recreating these fun cookies, here are a few tips on flooding. It’s really quite simple. Give it a whirl.
Icing - First of all, you have to have the right type of icing: royal icing. Don’t let the name scare you, it’s just one pound of confectioner’s sugar, five tablespoons of meringue powder, a half cup of water (or less) and gel-paste food coloring (available at most bakery and craft stores; the food coloring in grocery stores is usually very watery taking more of it to achieve the color you want). You’ll need to mix the icing until it’s fluffy, yet dense, about seven to eight minutes. Then you’ll need to use the icing immediately or transfer it to an airtight container.
Coloring - Separate your icing into the number of colors you need for your project. Then color your icing one drop of gel at a time. It’s a lot stronger than you might think. Once all the icing is the colors you need, separate them again so that you can thin one half for flooding. With your second set, thin each color with one teaspoon of water at a time. Often, one teaspoon is all it takes depending on how many times you’ve separated your icing. Now you have thick and thin versions of all the colors you need.
Tools - Trim one corner of a resealable bag and insert a #3 icing tip with a connector. Repeat this process for each of your colors (thin and thick). Then spoon each into a bag. (I always mark the thin bags so I don’t accidentally ruin a cookie by trying to trim it with the thin icing.)
Flooding technique - Now that your icing is prepped, take a cooled sugar cookie and pipe an outline around the shape. Allow it to set for 10 to 15 seconds and then you can flood the cookie with the thinner version of the color. While the flooded color is still wet pull it to the edges of the outline with a toothpick. You can even add a different thinned color to make polka dots or other designs. Doing it quickly will allow the second color to settle into the flooded color and dry flat. Allow the flooded colors to set for several minutes before adding any additional piping or layers to your design (like the flames).
Happy baking everyone!
Tags: guitar flames cookie cutter, music note cookie cutter, rock n roll birthday party ideas
Posted in baking, pop star/rock n' roll · No Comments »
Written on April 25th, 2009 by Kim
We were recently featured on Homemaker Barbi for our super hero cape craft. You have to check it out and get the details. Here’s a small excerpt:
“Little imaginations soar at the thought of super powers. Watch their little eyes light up when you make them a personalized super hero cape of their very own.”
Here’s what you’ll need to get started:
Yard of light polyester knit
¼ yard flexible vinyl (or you could use felt)
Velcro dots
Fabric glue
Wax paper (36×36 inches)
Pencil
Stick pins
String
Measuring tape
Make sure and visit Homemaker Barbi for all the “how to” details.
Happy crafting!
Tags: DIY super hero cape craft, Homemaker Barbi featured The Celebration Shoppe
Posted in Kim's crafts, crafts · No Comments »