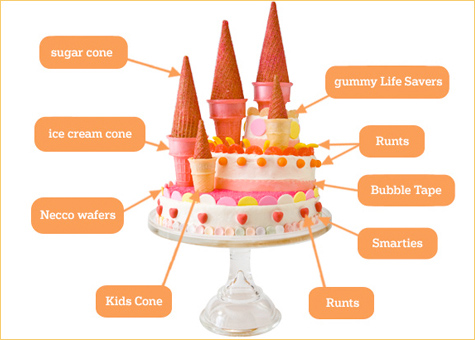
Written on April 21st, 2009 by Kim
This cake idea is a beautiful way to shower your bride-to-be with something sweet. And if you’re not comfortable with tiers, this would also be very pretty as a one tier. Here’s what you’ll need:
- 2 white cake mixes
- 2 cans white icing {cream cheese is my favorite!}
- Edible flowers (e.g., day lilies)
- Sugar cookie dough {a roll/stick from the grocery works just fine; no need to make this difficult}
- Gel food coloring
- Icing tips
- Resealable bags (freezer weight are best)
- Tip connectors
- Cake cookie cutter {scroll down the page for a cake cookie cutter and diamond ring cookie cutter}
- Two 8″ round cake pans
- One 6″ springform cake pan
- 10″ pedestal cake plate
- Freezer paper
- (Note: You could also go with 10″ and 8″ pans depending on the number of people you’re planning to serve.)
My advice, bake your cookies and decorate them a few days before the event so that you don’t feel rushed. As a matter of fact, you can bake your shapes and freeze them (without icing) up to a month in advance. As for decorating your cookies, I’m not going to go into great length in this post, but if you’re not familiar with flooding cookies or baking sugar cookies for that matter, make sure and check out previous posts with my tips on how to make sugar cookies keep their shape and my tips on flooding cookies.
As for the cake:
- Bake your cakes and allow them to cool completely before starting the icing process.
- Place freezer paper on your cake plate in two or three sections that you can easily remove after icing your cakes. This will keep your cake plate tidy.
- Place your first 8″ cake on your cake plate, ice the top and stack on your second 8″ cake. Now apply a thin crumb coat to the entire cake. Repeat this with your 6″ cake and allow both to set before icing your top coat. This will keep cake crumbs from appearing in your beautiful icing work.
- This cake has a very smooth icing, not fondant, but a skilled hand at a smooth coat. If you want this effect, use an icing spatula and work in one direction with even strokes. But, you could also have a more whimsical effect with your icing and it would look just as beautiful. Don’t be afraid to make this cake your own.
- Once iced, embellish your cake with your sugar cookies. If your icing has set, just use a fresh dollop as glue to hold your cookies in place.
- You could further embellish with edible flowers or you could even pipe on your own.
Remember, don’t be afraid to be creative. Happy baking!
Tags: bridal shower cookie cake idea, DIY cookie flooding
Posted in bridal shower, cakes & cupcakes · 1 Comment »
Written on April 21st, 2009 by Kim
Here’s a very fun cake, or more accurately cupcake, idea to complement our Safari birthday party theme. (The picture is the actual one I made for my little guy’s birthday last year.)
Don’t let it intimidate you, it is actually very easy to pull off. You’ll need to get the Hello! Cupcake book for all details Since they’ve not published the “how to” details for this particular idea on their blog, then I very well can’t. But trust me, the book is worth the money if you like easy ideas and tips on decorating cupcakes.
Tags: crocodile cupcakes, safari zoo birthday party theme idea
Posted in cakes & cupcakes, safari · No Comments »
Written on April 16th, 2009 by Kim
If you have a rock star, or even just a Guitar Hero, Hannah Montana or American Idol fan, living in your house, this birthday party theme is a must have! And in addition to our oh so creative “rock star” custom invitation, check out the cool party décor to complement: plates, napkins, cookie cutters and a fun guitar shaped mylar balloon too.
Make sure and visit again as we’ll be adding a number of fun favor and baking ideas over the coming weeks. See what we have so in our archives under pop star/rock n’ roll.
As always we would love your feedback on this invitation design as well as any of our others.
Plus, if you have a theme design you’re searching for and can’t find, we want to know that too! You can e-mail us at ideas@celebrationshoppe.com or post a comment here.
Tags: guitar rock n' roll theme, pop rock star birthday party invitation
Posted in about us, pop star/rock n' roll · No Comments »
Written on April 16th, 2009 by Kim
Today we’re launching our new “rock star” birthday party theme complete with cool and creative décor (that would be perfect for any American Idol party). In honor of this new custom invitation, check out this fun microphone birthday party cake. I have to say, parenting.com did an exceptional job with creating a series of super fun birthday cakes!
Here’s what you’ll need for this one:
- 12 colored ice cream cones
- 1 large bag jelly beans, M&M’s, or other preferred small candies
- 1 can (12 oz) whipped chocolate frosting
- 12 baked cupcakes, paper liners removed
- 1 ½ cups chocolate sprinkles
- 12 (3-inch) lengths of black licorice laces
Check out parenting.com for the how to! Happy baking.
Tags: ice cream cone cakes, rock star American Idol microphone birthday cake idea
Posted in cakes & cupcakes, pop star/rock n' roll · 1 Comment »
Written on April 15th, 2009 by Kim
I found these on about.com submitted from baker, Johanna Widrig, and wanted to share. The cupcake itself is not difficult, it’s making the fondant soccer ball that might take a little time and okay… some patience. But you have to agree that the outcome is awesome. Plus, your guests can just lift off the ball and eat the yummy cupcake!
A tip on the ball, you can buy boxes of pre-made fondant at your craft store. Roll your balls by hand. Then, tint some black with gel food coloring (the other is water-based and won’t do as well). Roll out the black and cut out your shapes with an exactor knife. If you have to use a kitchen knife make sure it isn’t serrated. Now apply your black shapes with a touch of icing and connect them with a black cake writing pen.
Here’s what the baker, Johanna, had to say. “These are just a few of the soccer ball cupcakes I created for an 11 year old soccer fan’s birthday. I did both vanilla and chocolate, with butter cream icing using a Wilton grass tip. I made the soccer balls by hand using fondant. They were a labor of love, but the end result was exactly what I was hoping to create!”
Happy baking!
Posted in cakes & cupcakes, sports · No Comments »