Table of Contents[Hide][Show]
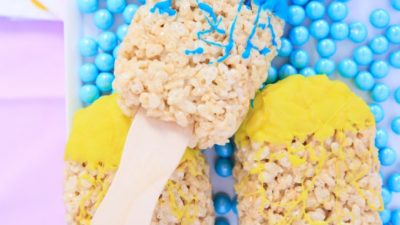
Rice Krispies paint brushes are easy to make and the perfect addition for any art party! I make a lot of Rice Krispies Treats, it’s a family favorite, so sometimes I get creative to mix things up and make fun treats out of them!


I created these paint brush shaped Rice Krispies Treats as an easy fun food idea to go with my Art party paper craft collection. You can see tons of the ideas from that party below.
Paint Brush Rice Krispies Ingredients
- Kellogg’s Rice Krispies Cereal
- Marshmallows
- Butter ~ for dairy free, use vegan Smart Balance butter
- Chocolate Wafers ~ for dairy free, use tinted icing
- Wooden Ice Cream Spoons (I picked mine up at JoAnn)
- Wax Paper


Rice Krispies Paint Brushes Instructions
First of all, Kellogg’s has it down. Make your Kellogg’s Rice Krispies Treats (cereal, butter and marshmallows) using the directions on the box. Why mess with a good thing!
Here’s how you make the paint brush rice krispies treats:
- Mold Paint Brush Shape – Allow the mixture to cool from hot to warm, apply butter to your hands liberally, mold the treats into rectangles and place the shapes on a piece of wax paper to cool.
- Insert Wooden Spoon – Before the treats harden completely, insert the wooden ice cream spoons about half way.
- Dip In Chocolate – Heat the chocolate melts in a microwave safe bowl in increments of eight to nine seconds and stir between heating. Once the chocolate is completely melted, dip the Kellogg’s Rice Krispies Treats into the chocolate and allow the excess to drip off.
- Cool – Place the paint brush Rice Krispies Treats on a sheet of wax paper to dry and harden.


Watch A Video – How To Make Rice Krispies Paint Brushes
Rather watch a video of how to make Rice Krispies paint brushes instead of reading all the instructions? I get it, sometimes video is just easier! Join me and let’s make these easy paint bush Rice Krispies Treats together!
Package Paint Brush Rice Krispies
Now that your Rice Krispies Treat paint brushes are done, all you need to do is display them for your party. You can place them on a white tray filled with sprinkles, fun! Or, you can do what I did and display them in a clear paint brush can.


More Ideas For An Art Birthday Party
- 10 Art Party Ideas
- How To Make Sidewalk Chalk
- DIY Art Easels – A Kid’s Craft
- 3-D Paper Cupcake Art – A Kid’s Craft
- Art Party Crayon Craft & Teacher Gift Idea
More Rice Krispies Treats Fun Food Ideas
- Monsters Inc “Mike” Rice Krispies Treats
- Carrot Shaped Rice Krispies Treats for Easter
- Football Jersey Pull-A-Part Rice Krispies Treats Cake
- Easter Bunny Rice Krispies Treats
- Valentines Day Rice Krispies Treat Hearts
- Pooh’s Honey Pot Rice Krispies Treats
As always, I hope you’re inspired to craft, bake, create and celebrate!
INSTAGRAM | FACEBOOK | PINTEREST | GOOGLE+ | TWITTER | YOUTUBE | BLOGLOVIN
This DIY project is sponsored by Kellogg’s Snack Picks. Thank you for supporting my wonderful sponsors. They make it possible for me to keep the ideas coming! All content, ideas, photography and opinions are that of my own and I’d have it no other way! There may be affiliate links within this post, of which we do earn a small fee at no cost to you.
Original idea, Paint Brush Rice Krispies, created by Kim Byers, seen here at The Celebration Shoppe first. Now it’s all over the Internet. ;)
 relax with a mocktail moms!