
When I posted my son’s 7th robot birthday party I shared my tale of woe… my cake fell off the table as the guests were arriving. I was too upset back then to remake the cake so I could share the idea with all of you. Well I’ve finally gotten over it… sort of. {wink}
At any rate, tah-dah! Here it is. The second cake I ever decorated with party printables (my youngest son’s pirate cake was the first and yes, I still need to post it!).
With printables everywhere, I’ve never seen anyone else do this, so it makes me pretty giddy to share how super easy it is. Did you see my DIY nautical party cake? Love that one. And my DIY Easter bunny cake? The Easter printables are FREE!

So here’s how you make this one! Start with a flat iced two-layer cake. This one came from Kroger and only ran me $15 with buttercream icing. Yep. No baking required unless you just want to. {grin}
I cut off the edge of the cardboard bottom with a straight edge and then filled in my cake plate with bright red sixlets.

You’ll need my printable robot cake kit (available in the shoppe Wednesday), which includes the rounds (robot faces and personalized gears with your child’s name or initial) and a set of three large gears, plus lollipop sticks and hot glue.
Punch out the rounds with a 2.5″ punch (found at any craft store or online at Amazon.com).

Cut a lollipop stick in half and hot glue the round to flat end of your stick. Repeat.

Insert the rounds in the side of the cake, at equal distances.

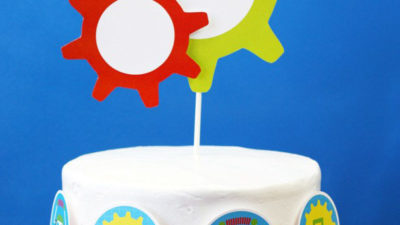
Next, make the gear topper.


Cut out the gears.

For a 3-D effect, use foam adhesive dots to separate the gears before attaching them to the lollipop stick.

Insert the topper in the cake and you have a very easy and creative robot birthday cake for under $25! Stop in the shoppe to see the entire Robot Birthday Party Collection.
As always, I hope you’re inspired to craft, bake and create!
Join The Celebration Shoppe on facebook, sign-up for the daily ideas to come right to your inbox (never miss an idea, giveaway or free printable!), follow us on twitter, pinterest and on instagram at @thecelebrationshoppe.
 monogrammed pirate t-shirts