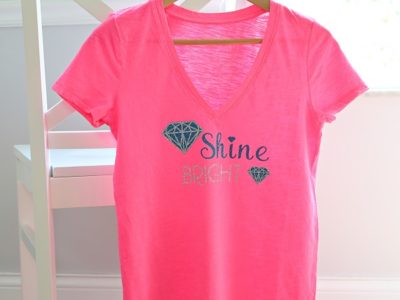
I can’t get enough of DIY graphic tees right now! This Shine Bright graphic tee is my latest creation. The two-layer diamond art is part of my new collection with Cricut so it’s super easy to cut. Let’s make one!

Iron-on is such a fun material. It comes in a ton of colors, even blue and silver glitter like this one. And any cut is possible with a Cricut Explore. I’ve been making a ton of shirts lately, but you can embellish anything fabric: bags, shoes, wall canvas… so many options. By the way, there is also red, blue, silver and pink glitter iron-on I know. Cricut is always coming out with new colors.
For this tee, I took my new layered diamond die cut that I designed for my “You’re A Gem” card, and paired it with two Cricut fonts, Seaside and Soiree. You can use my Make It Now project or you can create your own!
Here’s what you’ll need:
- T-shirt
- Blue Glitter Iron-On
- Silver Glitter Iron-On
- Cricut Explore™ machine
- Cricut Design Space™ software (iPad app, iPhone app or Desktop)
- 12”x12” Standard Grip Cricut® mat
- Iron
Super simple how to steps:
- Measure – measure your T-shirt. Depending on the cut of your shirt you may want to lay your shirt flat, measure it across, divide it to find your center point, and determine if you’d like the image larger or smaller.
- Design – use my Make It Now with Seaside and Soiree fonts.
- Mat – apply the iron-on, liner side down, to the mat.
- Cut – read the directions on the package, but make sure that you absolutely “Mirror-Image” your cut or you’ll need to look in a mirror to read it. {wink}
- Weed – weed out all the iron-on that isn’t your image. This takes a bit of patience, but it’s worth it.
- Iron – iron your shirt to heat up the fabric, place the image with liner on top, iron in 15 second intervals. Glitter takes a bit more heat to apply than regular iron-on so test. Also it’s a good idea to flip the shirt (once you think design is set) and iron the back too just to make sure. Take your time! And since this one is two layers, make sure the bottom layer is well set, then just iron the next color on top.
If you’ve ever wondered about layering colors when making a iron-on tee, this is the perfect shirt design to test. I suggest a bit more time making sure the design is set, but once it is, it won’t come off. (Tip: Wash the shirt inside out and on gentle. Or, wash the shirt in a bag.)
 See how cute it turned out!

Make sure you check out how to make my “This Makers Gonna Make and Take” tee, as well as my “Makers Gonna Make” coffee mug design. Design Space makes it so easy to create your own designs too!

This same iron-on process works beautifully for canvas too! Hop over to my Office Refresh post where I created a DIY Disney Quote in gold and black for my wall. I’ll show you how to create professional looking wall art for your home with your Cricut too!

More Fun Graphic Tees:
As always, I hope you’re inspired to craft, bake, create and celebrate!
INSTAGRAM | FACEBOOK | PINTEREST | GOOGLE+ | TWITTER | YOUTUBE | BLOGLOVIN
DIY Tshirt Idea – Shine Bright seen on The Celebration Shoppe first.
This post contains affiliate links, which means that if you click on one of the product links, I might receive compensation to feed the family and keep the party going here on The Celebration Shoppe.
 Buzzing Bee Scallop Placecards & Food Tents