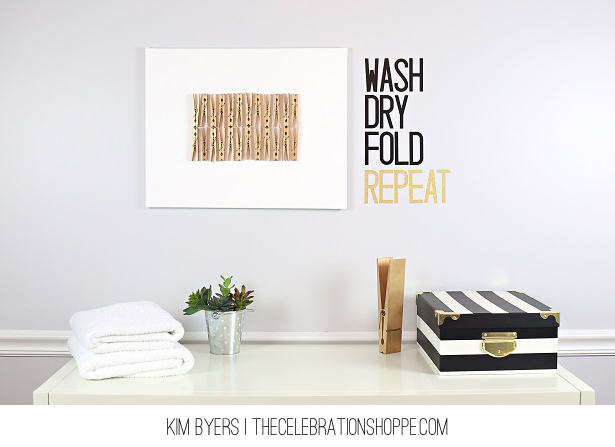
milk & cookies Christmas party

For my most recent Kellogg’s Snackpicks.com article I created a simple milk and cookies party idea inspired by “the big guy” himself, Santa of course! 

And the best part, I didn’t bake a thing! I let the elves handle that part, the Keebler® Elves that is! {wink}

The table was packed with all of your family favorites with fun holiday names: Keebler Fudge StripesTM {wreaths}, Vienna Fingers® {sleighs}, Fudge Sticks {North Poles}, E.L. Fudge® Elves {elves} and Chips Deluxe® {ornaments}.

Hop over to Snackpicks.com for ideas on how to easily embellish your cookie wreaths and North Poles, ideas on how to style your dessert table…

plus a DIY tutorial for my coffee filter cookie sleeves! 

You can also find my complete Santa printable party collection in the shoppe including beverage wrappers, dessert tags, cupcake wrappers and dessert table mat. As always, I hope you’re inspired to craft, bake and create! 

Join us on facebook, sign-up for our daily feedburner e-mail (box in the right navigation), follow us on twitter and pinterest.

you may also like:

DIY Santa party favors

I had a little DIY fun this past weekend with the boys. We were testing a few ideas for our cookie decorating party favors and we came up with these little Santas.

You’ll need red, black and silver cardstock, cotton balls, pretzel size cello bags, cotton balls, tape, stick glue and candy. I used soft peppermint sticks and red cherry slices. 

Punch or cut out a red 2.5″ circle and trim a out a quarter of it like a pacman.

Close the circle and tape it on the inside. Next unroll a cotton ball. Add a small amount of glue to the rim of the hat and to the tip. Edge the hat with the cotton ball and then form a small ball for the top.

Cut strips of black cardstock for the belt and small silver cardstock squares for the buckle. Fill in the center of the buckle with a black thin point Sharpie and attach to the center of the belt with a touch of glue.

Insert the candy, fold the cello over in the back and tape. Wrap the waist with Santa’s belt and top with Santa’s hat, using a small piece of tape to keep both in place.

Waalaa! Fun and super easy Santa party favor idea. As always, I hope you’re inspired to craft, bake and create!

Join us on  facebookfollow us on twitter and pinterest.

you may also like:

Christmas tree footprint art

I often wish I could freeze time. My little boys are the most precious part of my life and I just want to squeeze them and snuggle with them forever.

But every time I turn around they’ve grown another two inches, so I’m always looking for ways to capture their sweet little features… like their little feet!

For your Christmas tree footprint art, you’ll need: white canvas and paint: Christmas Green, Cranberry and Bright Yellow. (I picked up all of my supplies from JoAnn Fabric and Craft Stores.)

And little feet. {wink}

Aren’t they sweet?!

Next, cut a piece of paper the size of your white space to the right of your print and write your child’s name on it. Then cut out each letter and place them next to the print. This will allow your child to keep good spacing when painting on their name.  

Now it’s time to let the little ones paint. We started with a star to top our tree.

Next we added their names. I suggest starting with the middle letters in case they get a little high or a little low so you can correct the spacing with the top and bottom letters.

And we finish with the year.

As always, I hope you’re inspired to craft, bake and create! Happy Monday everyone!

Join us on facebookfollow us on twitter and pinterest. Participating in Tip Junkie’s Tip Me Tuesday.

you may also like:

DIY snowman cello bag treats

I’m a bit excited to share my snowman cello bag treat craft with you this morning! I’m just in love with him and he will absolutely be making an appearance at school this season, at my Snowman party in January (the kids keep wanting to have a snow related party so they can have a snowball fight off the new tree house with friends) and maybe even at my annual Christmas cookie decorating party… I plan to use my Santa collection… hmmm… {note to self: make a Santa version! Update! Made Santa version!}. 

Here’s what you’ll need: white powdered donut holes, pretzel cello bags (I picked mine up at JoAnn Fabric and Craft Stores), orange and black ultra thin point Sharpies, craft paper (the designs shown are from my Ice Cream Social collection) and tape.

Start by putting three donut holes in a cello to measure approximate height. Cut a strip of paper that length and insert it into your pretzel cello bag as a guide. Draw on your snowman’s carrot nose with the orange Sharpie and the eyes, mouth and buttons with the black Sharpie.

Punch a 1″ circle and a 2″ circle (my Fiskar punches came from JoAnn Fabric and Craft Stores) for the hat brim and top. Cut a 1″x3.5″ strip for the hat and a 1/4″ wide strip for the scarf.

Assemble the hat with tape. (Note: Use your 1″ circle to make sure the diameter of your hat is correct. I allowed for overlap in the 1″x3.5″ strip.)

Trim fringe on the end of the scarf and attach just below the first donut with a touch of glue or tape. 

And if you like my snowman cello bag treats, make sure you hop over and check out my Halloween monster cello bag treats and my Thanksgiving turkey cello bag treats for next year!

As always, I hope you’re inspired to craft, bake and create!

Join us on facebook, signup for our newlsetter with weekly offers,  follow us on twitter and pinterest. Participating in Tip Junkie’s Tip Me Tuesday, Be Different Act Normal, I Heart Naptime Sundae Scoop and Tatortots & Jello Weekend Wrap Up.

you may also like:

DIY Christmas ornament curtain

I’ve been hanging Christmas ornament curtains on my little kitchen window for the last four years and everyone that comes to visit comments on how simple and pretty it is. So this year I grabbed my camera!

You’ll need a small white tension rod, ribbon and pretty ornaments. (I picked my tension rod up at JoAnn Fabric and Craft Stores. I think I only paid a $1 or $2 for it.)

The toughest part was getting my ribbon lengths the same for each ornament set. Now I just store them on the ribbon so I never have to do it again. {wink}

As always, I hope you’re inspired to craft, bake and create!

Join us on facebook, signup for our newlsetter with weekly offers,  follow us on twitter and pinterest. Participating in Tip Junkie’s Tip Me Tuesday, The DIY Showoff and I Heart Naptime Sundae Scoop.

you may also like: