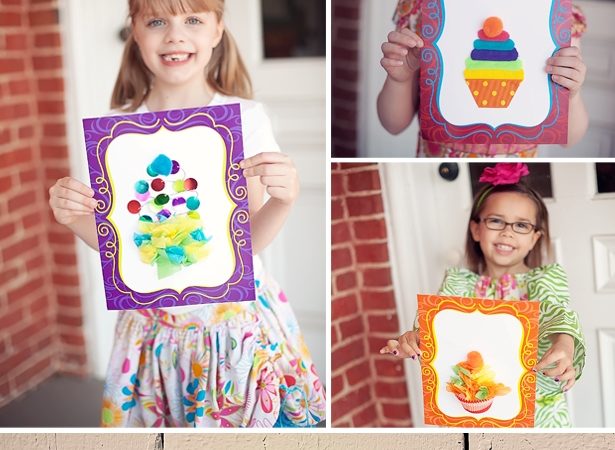
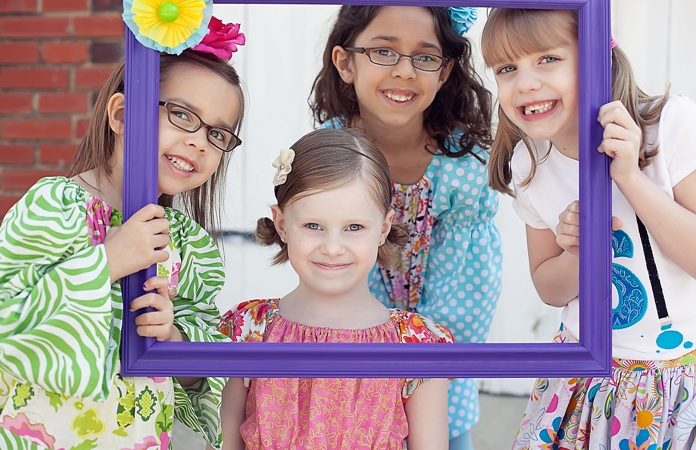
kid craft: hot plate artwork

I just want to wish all of you a very Merry Christmas and share with you my first gift of the holiday season {proud mom moment}. My kindergartner surprised me on Tuesday with a hand-painted tile. He explained it to be a hot plate, but I’ll never put anything hot near it (and my hubby better not either!). It’s just too lovely. Plus, the back has an outline of his little hand and his signature!

He explained to me the process and the tools you’ll need:

  • smooth white glossy tile from the home improvement store
  • Sharpie markers
  • spray sealent (Update per his teacher: Krylon Crystal Clear Acrylic Coating)
  • marbles for the feet
  • wood glue (Update per his teacher: she attached the marbles with regular wood glue)

How tos as explained by my six-year-old. {wink}

  1. Draw your favorite picture with Sharpies {I of course am in love with his snowman and snowflakes}
  2. Spray the picture (with sealant) and let it dry
  3. Attach marbles for the feet
  4. Write your name on the back (and outline their little hand so you can always remember how small they are)

And now you have a precious keepsake! I have to write his teacher a sweet note because this is one of those things I’ll have in my “happy box” and proudly diplay every year for the rest of my life, much to his chagrin in his teen years I’m sure. {giggle}

Merry Christmas to you and yours! Talk with you all next week and as always, I hope you’re inspired!

Like us on facebook and follow us on twitter!

you may also like:

real parties: under construction

construction-birthday-party-a

I was blog surfing this weekend and came across this “can you dig it?” birthday party over at the Team Smith blog. I was instantly in love with all the details. This mom went to great lengths to create the perfect birthday party for her little one and you can tell from his beautiful smiling face on her blog that he loved it!

She greeted her little workers with tool belts and personalized construction hats and gave them plenty to do with tons of activities: the ”digging” sand pile (shown here), a cardboard house to paint, bricks to lay, equipment to ride. You simply must hop over to see all the creative details.

construction-birthday-party-b

And once the work was done, she, in true mom style, fed her crew. I just love the hounds-tooth paper; a very clever spin for a construction party. Look closely and you’ll see tape measures instead of ribbon on the serving pails. Oh, and the blueprint tablecloth, crayons and construction cone cups! L-O-V-E it!   

construction-birthday-party-cake

Last but not least, the perfect construction cake: trucks, chocolate rocks and rich fudge icing! It’s actually funny because I just saw these chocolate rocks at our local candy store on Friday when I was picking up red sour balls for our new Rock Star collection. Point? Make sure you check your specialty candy stores when trying to get creative; you might find just the inspiration you need.

Truly great job Caryn!

you may also like:

DIY toss game

diy-toss-game

And last but not least for our deep blue sea bash, we made a toss game to match our party theme. The great thing about this is you could change the shapes and fabric to match any kind of party theme. Here’s what you’ll need:

  • 2 yards of coordinating fabric
  • 3 pre-cut squares of coordinating felt
  • plywood (or foam board if you don’t have a saw handy)
  • fabric glue
  • staple gun

And here are the super simple steps:

  1. Have the hardware store cut your board to size (3′ x 4′) and have someone handy with a saw to cut your circular holes.
  2. Cover the board with fabric using a staple gun.
  3. Next find the center of each hole, cut a small slit and then cut strips folding the fabric back to cover the hole sides and stapling them in place.
  4. Cut out a fish template from the felt and then a circle in the center, the same size as the hole in the board. Apply the fish with fabric glue.
  5. Finally cut out numbers for each hole and apply those with fabric glue.

We placed ours on an easel that my hubby whipped up, but you could lean it against a tree or make small wooden feet for yours. As for what to throw, use either balls or beanbags and hand out prizes for all those who play! Happy crafting.

you may also like:

customer: swashbucklin inspiration

pirate-party-table-decor

I was Googling {it’s now a verb!} around and came across a very fun picture of a pirate birthday party. I clicked to see more and realized it was our table decor, pirate ship, gable favor boxes (can’t take credit for the fun stickers) and polka dot & stripe black candles.  It’s rare that we get to see what magic moms put together when they buy our supplies and I have to admit I giggled a little. I still love love love that moms like our designs and decor enough to want it for their little ones. Anyway, I digress! Here is the beautiful pirate birthday party for two twin boys from the erinandaaron.com blog.

pirate-party-banner

She crafted this wonderful door hanger to greet her guests and this beautiful birthday party banner. {Great work mom!}

pirate-cake

As I mentioned, the party was for twins so they not only had this beautiful cake for guests, but they made it very special and had individual cakes for the boys. {There are our candles!}

pirate-party-games

And what’s a party without games. Love the walk the plank! And check out the treasure hunt. If you like what you see here you need to visit erinandaaron.com to read all the wonderful details and resources.

you may also like:

mermaid princess crafts

shell-crown-craft

I showcased a few ocean party ideas from Family Fun magazine in yesterday’s post. Today I’m sharing a few more for the royal princess living in your midst.

This first one, a beautiful shell crown, is a must for any mermaid princess. You’ll need:

  • Heavy cardstock large enough to encircle your child’s head
  • Tiara or crown template available at FamilyFun.com/magazine
  • Small shells (large shells will be too heavy and weight down the craft paper)
  • Tacky glue or hot glue
  • Sand
  • Glitter

And here are the simple steps to make this beautiful crown:

  1. Using the template provided by Family Fun, draw and trimout the design. (A cutting mat and staight edge would be helpful.)
  2. Place your shells and then affix them with glue.
  3. Before the glue drys completely sprinkle on sand and glitter to fill in the open spaces.
  4. Allow the crown to dry and then secure it into a circle that will fit your child’s head.

mermaid-party-photo-op

This next craft is too adorable and perfect for photo ops. You’ll need:

  • Flat bedsheet
  •  Washable marker
  • Nondimensional fabric paint (e.g., DecoArt SoSoft)
  • Felt
  • Fabric glue

And here are the super simple steps:

  1. Lay the bedsheet down on a hard flat surface and have your child lie down in the center so that his or her neck lines up with the top edge.
  2. Using the washable marker, trace the child’s body and then sketch the design on top of the outline. (See the mermaid in the upper right corner.)
  3. Now use the fabric paint to create your mermaid. 
  4. I’ve added my own twist here. Paint the mermaid tail, but then embellish it with glitter felt (the craft store usually has pink and purle!) scales.
  5. Hang your sheet on a laundry line to dry and let the magic begin.
  6. NOTE: Follow the package instructions for setting the paint and laundering the sheet.

Happy crafting!

you may also like:

pin-the-jewel-on-the-crown

princessgame Here’s a twist on pin-the-tail-on-the-donkey, pin-the-jewel-on-the-crown. Here’s what you need:

  • 1 yard brown or gold wrapping paper
  • Jewel tone craft paper or construction paper
  • Blind fold
  • Double sided tape
  • Prizes

And here are the simple steps:

  1. Cut a crown shape out of the wrapping paper.
  2. Cut shapes (diamonds, octagons, circles) out of the jewel tone craft paper.
  3. Cut an “X” out of the jewel tone craft paper.
  4. Just before the game begins, put a piece of double sided tape on the back of your jewels. (Tip: Do not use “permanent” unless you want them to play the game only once.)

And here’s how they play:

  • Mark the crown with the “X” showing the kids what they’re aiming for.
  • Blind fold each, spin them and let them put their jewel (with double sided tape) on the crown.
  • Whoever gets closest to your “X” wins the round and the prize.
  • Keep playing as many times as it takes for everyone to win or you run out of prizes. {wink}

 Image: Country Living

you may also like: