Written on September 28th, 2009 by Kim

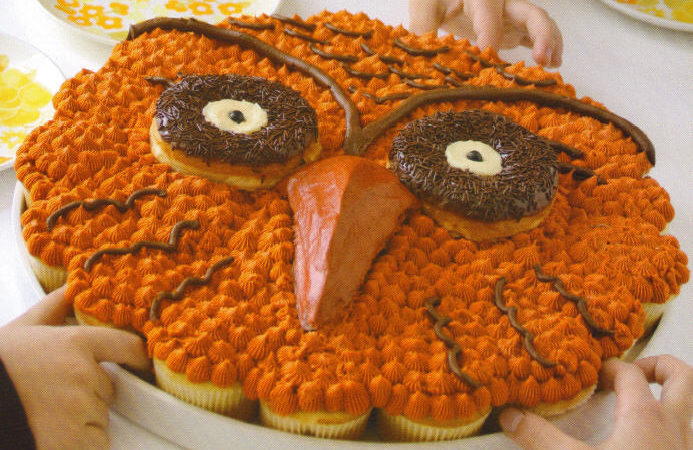
I was browsing through my many Halloween decorating books for inspiration staging my own Halloween party this year and I ran across this great pull-a-part owl cupcake from Matthew Mead’s 2008 Halloween Tricks and Treats book.
So many of us are into owls right now and not just for Halloween. I myself have three invitations in my shoppe sporting this nightly creature. As is, this guy would be perfect for my campout invitation and with a few color changes and maybe a nicer demeanor he could be perfect for my owl fun birthday party or owl couple baby shower.
Here’s what you’ll need:
- 30 unfrosted cupcakes
- 4 cans icing
- 2 chocolate glazed jimmy-topped donuts
- 2 black jelly beans
- Orange, red and brown gel food coloring
- Resealable bags (freezer weight) with couplers
- #199 fine cut tip
- #2 and #5 round tips
- Offset spatula
And here’s how you pull it together {wink}:
- Arrange cupcakes on large round platter (shown at 16″ diameter)
- Spoon 3/4 cup icing into a small bowl and tint with 23 drops of orange food coloring and 10 drops of red food coloring, mixing until blended for the beak. Spoon 1/4 cup frosting into a second bowl and tint with brown food coloring for accents. Take out 2 large dollops of icing and then tint the remaining 3 cups with 30 drops of orange food coloring, 9 drops of red food coloring and 6 drops of red food coloring.
- Fit a resealable bag witha #199 tip. Fill the bag with the orange icing. Cover the top of the assembled cupcakes with “feather” peaks as shown. For each peak, hold the bag straight up with the tip against the cake; squeeze the bag, keeping the tip in the icing until the peak forms; stop the pressure and reposition the tip for the next peak. Work from the center out, rotating the plate; refill the bag as needed.
- Place the donut tops on the frosted cake for eyes. Remember those two large dollops of icing you kept out, now pipe them into the center of the donuts for the whites of his eyes and top them with a jelly bean. For the beak, use a spoon to place 3 dollops of frosting on the cake: start with a largish dollop near the eyes, then add 2 dollops below it, each smaller than the previous. Run the spatula under hot water until heated, dry thoroughly and use to contour the beak as shown.
- Fit another resealable bag with the #5 tip and fill it with brown icing. Hold the bag at a n angle and pipe the brown outline onto the cake as shown. Change the tip to a #2 and pipe on the squiggle details.
Enjoy and make sure and check out Matthew’s 2009 Halloween book. You can see a preview at MatthewMeadStyle.com.
Tags: campout party, donut cupcake, owl pull-a-part cupcake
Posted in cakes & cupcakes, halloween, owls · 3 Comments »
Written on February 14th, 2009 by Kim
Finding things to entertain your children through the long winter months, especially those that are very active outdoors when it’s warm, can be challenging. So why not think inside your box and have a camp in. I’ve not met a kid yet that cared if their s’ mores was made over a campfire or in an oven.
Here are a few ideas on how to set the stage and enjoy some family time:
- Campfire - most of us have one built right in; it’s called a fireplace.
- Sleeping arrangements- for young kids, pitch a tent in the living room, the kind that pop to life. For everyone else, arrange sleeping bags on the floor.
- Ghost stories -leave the television off for a night and tell ghost stories to each other. And if you just must have the television, make it a movie night without cell phones or computers.
- Goodies - serve all the same things you would if you were outside: hotdogs, marshmallows, hot chocolate, popcorn.
- Night sky - pick up those peel-n-stick stars that glow in the dark. I know what you’re thinking, “I’m not putting those on my living room ceiling.” Don’t peel off the backing, instead use some double sided tape or a hot glue gun to attach them to the ceiling and they’ll pull right off with no damage in the morning.
- Breakfast - don’t let the fun end as soon as the sun rises. Have breakfast together and leave the outside world at bay as long as you all can resist.
Tags: campout party, family winter activity with kids
Posted in campout · No Comments »
Written on August 11th, 2008 by Kim
My oldest has been asking to have a campout ever since we staged the photo shoot for our campout party theme. So on Friday, we gave in. For treats we created a cupcake version of the campfire cake I posted a few weeks ago. Instead of Twix bars for the wood we used pretzels and instead of marshmallows for the fire we used yellow and orange icing.
And for those moms out there with little ones that suffer from food allergies like my youngest does, here’s how you can make them egg and dairy free:
Using a Duncan Hines brownie mix (yields 12 cupcakes), add water, oil and egg (I use 2 pureed apricot halves instead) per the instructions. Once the brownies have cooled (because they will fall slightly) decorate them:
- Fire - prepare a mixture of orange and yellow icing and place a dollop in the center
- Rocks - apply pecans or walnut pieces to the outer rim
- Sticks - break small pretzel sticks in half and carefully prop them against the fire
Idea source: Original
Tags: campfire cupcake, campout party
Posted in baking, cakes & cupcakes, campout, egg and dairy free · No Comments »
Written on July 30th, 2008 by Kim
Over the past few days I’ve shared some fun ideas about how to pull together a great campout. But really, the first thing you need is an invitation to get everyone excited. We designed just the one, from the owl to the campfire to the cool blue moon, this invitation is sure to be accepted. Who hoo could resist?
Check out the invitation and the party decor.
Tags: campout party, owl invitation
Posted in campout · No Comments »
Written on July 25th, 2008 by Kim
On the topic of having a campout party, set the stage by pitching the tents and building the fire pit in advance of your guests’ arrival. Then name your new camp something fun, like Camp Firefly. If you want the wow! factor, create and hang a banner before everyone arrives. Or, you could make it an activity for them. You’ll need a few things:
- Banner - 24″ x 72″ cut of fabric, grummets
- Camp name - ½ yard coordinate fabric, a 10″ letter template (enlarge in Word), scissors, fabric glue
- Placement - string (note: If you don’t have trees nearby, hammer two dowels in the ground and tie your banner to them.)
If you find yourself short on time, take the easy way out and order a banner from your local office supply store. It will cost you a little more, but you can check it off the list quickly.
Tags: campout activities, campout party
Posted in activities/games, campout, crafts · No Comments »